
Facebook sign up: get a Facebook account or make a new profile
![]() The first step to going on Facebook is to get a profile: in this tutorial, we will explain how to create a Facebook account (your own "Facebook page" on the facebook.com website). The Facebook sign up process is quick, easy, and free. While you can view others' Facebook profile without having your own account, what you can do without a profile is limited.
The first step to going on Facebook is to get a profile: in this tutorial, we will explain how to create a Facebook account (your own "Facebook page" on the facebook.com website). The Facebook sign up process is quick, easy, and free. While you can view others' Facebook profile without having your own account, what you can do without a profile is limited.
Tip: everything on this page remains relevant since it was written. But, for a more detailed tutorial, specifically targeted at beginners, please see our dedicated “Create Facebook Account” website, whose screenshots reflect the radical design changes made in summer 2013!
Sign up to get your free Facebook account
First, go to the Signup Page on facebook.com (if no one is currently logged into Facebook on your computer, you will also be able to sign up for a profile from the Facebook homepage). The information you need to provide to create your account is so minimal that you'll get a Facebook profile within minutes:
The signup form, for new profiles
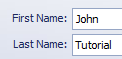 Under First Name and Last Name, enter your information as you would like it to appear on your Facebook page ("profile"). By default, this profile information is public, and will be visible to other Facebook users (members). While you may be concerned about privacy (a later tutorial will show you how to configure the privacy settings of your account), you should make your Facebook profile easy to find by friends and relatives: most of them will either google your name, or search for it using Facebook's built-in search engine.
Tip: should you include your current name or maiden name on your Facebook page? — New and recent friends will look for your married name ("Jane Smith"), but high school and college friends will search for your maiden name ("Jane Doe"). Including your maiden name in your profile will make it easier for people to find you on Facebook ("Jane Doe Smith"). Note that the name you choose when you first open your Facebook account can be changed later on.
Under Your Email, enter the email address you would like Facebook to use to contact you; this email address will not be posted on your public profile. The email address you enter will be used (1) to activate your account, and (2) to quickly find friends during the sign up process (more details below).
Tip: If you do not have an email address, you can easily sign up for one of the free popular webmail services: create a Yahoo email account or create a Hotmail account. (Avoid using your work or ISP address, since you may no longer have access to these once you change job or ISP.)
Then, type the password you want to protect and access your Facebook account: it should be hard enough to guess by others, but easy enough for you to remember, especially since you will likely login to Facebook from various computers (see our Facebook login and sign in settings tutorial for more information).
Finally, pick your gender to help Facebook determine how to talk about you in your profile ("John Tutorial has edited his/her profile"), and your date of birth under the Birthday dropdown menus: this allows Facebook to determine age-appropriate content for your account. (These two pieces of information are used by Facebook, but as you'll learn in a later tutorial, you can optionally hide them from your public profile.)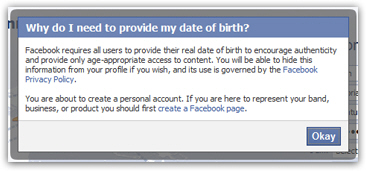
Confirm your new Facebook account information and sign up
Click the Sign Up button, and Facebook will next load a final verification (to avoid having "spambots" automatically make junk Facebook profiles). Enter the words displayed by the Security Check screen, and click on the Sign Up button again. (Also notice that you can go back and revise the profile information entered previously by clicking on the Back link.)
You will see an animation icon while Facebook creates your account; if you get a "You waited too long to solve the security check. Please enter a response now" timeout error message, simply re-enter the "captcha" verification words, and click Sign Up.
3 additional steps in the Facebook account creation process: Find Friends • Profile Information • Profile Picture
Facebook will then display 3 additional steps during the sign up process: each of these steps is optional, but an quick way to find information you will likely enter in your profile anyway.
First, you will see the "Step 1 - Find Friends" screen:
Facebook will automatically search your email account's address book using the credentials you supply under Your Email and Email Password. Because any one signing up for Facebook has supplied an email address, Facebook will be able to find friend's profiles based on the email addresses you have in your contacts. Click "Find Friends" to take advantage of Friend Finder, or do it later, manually (click on "Skip this step").
Facebook will then display the "Step 2 - Profile Information" screen: this gives you the option to enter your High School name and graduation date ("Class Year" dropdown), and "College / University" name and graduation year. Finally, enter (also optionally) your Company name.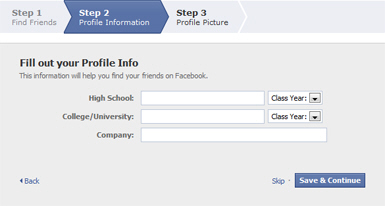
Tip: Entering academic and professional information in your Facebook profile is a quick way to find people who have gone in the same schools as you, or work for the same employer. Once you see profiles of users who have supplied an employer, for example, you will see that their company name is a link, which reveals with a click everyone who has entered this employer name.
Click Save & Continue to enter this information, or click "Skip" to leave it for later.
The final screen, "Step 3 - Profile Picture", lets you upload right away a picture for your Facebook profile; note that your picture is something you can easily change later on: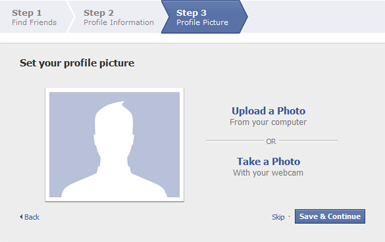
To pick a digital picture you have of yourself to use it on your Facebook profile, click on the Upload a Photo link to browse your files and folders. If you have a webcam, you can also click Take a Photo to take a snapshot of your face in front of a glaring screen (never too flattering an outcome). To leave this step for later, click on the Skip link; otherwise, click on Save & Continue after you have chosen a picture for your profile.
You have setup your Facebook profile!
You are done, and are now officially on Facebook - the last step is to verify the email address you supplied during sign up: go to your email account, and you should find a couple of messages from Facebook:
Open the "Just one more step to get started on Facebook" email, and click on the included verification link - in most cases, you will not need to enter any confirmation code (which is part of the verification link in the Facebook sign up account email).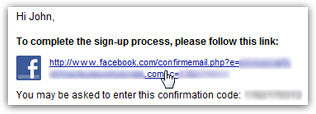
...And Facebook will give you a visual confirmation that your account has been confirmed: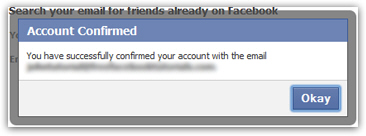
You have successfully signed up for your own Facebook page, and created a new profile!
Facebook Tutorial 
- Facebook Tutorials for Beginners:
- Facebook sign up: get a Facebook account or make a new profile
- Facebook Login + Sign in settings
- Add friends on Facebook (Send friend request to other members)
- Unrequest friends on Facebook (Unsend or cancel a friend request)
- Unfriend someone on Facebook (Remove or delete friends)
- Add or change your Facebook profile picture (main account photo)
- Make Facebook my homepage
- Update or change your relationship status on Facebook
These free Facebook tutorials were written for the new Facebook, and are updated with each latest version of your favorite social networking site on Windows and Mac.